On Windows 7 and 8, the default installation does not install lpr command. In order to test PCL fonts on a network printer, you need to install this command first. This article shows how.
Procedure 1. Procedure to install LPR command on Windows
-
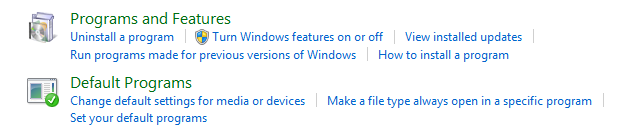
Click Start and choose Control Panel.
-
Select Programs and Features.
![]()
-
Select Turn Windows features on or off from the menu on the left.
-
In the Windows Features on or off window that appears, click on the + sign in front of Print and Document Services and check the boxes for LPD Print Service and LPR Port Monitor. Click .
![]()
-
Open command promp and enter lpr/?. You should see the following output, which indicates that the command is installed correctly.
C:\Users\morovia>lpr /?

Sends a print job to a network printer

Usage: lpr -S server -P printer [-C class] [-J job] [-o option] [-x] [-d] filename

Options:
      -S server    Name or ipaddress of the host providing lpd service
      -P printer   Name of the print queue
      -C class     Job classification for use on the burst page
      -J job       Job name to print on the burst page
      -o option    Indicates type of the file (by default assumes a text file)
                   Use "-o l" for binary (e.g. postscript) files
      -x           Compatibility with SunOS 4.1.x and prior
      -d           Send data file first