Quantcast
Channel: Morovia Knowledge Base
Viewing all 128 articles
Browse latest View live

PRB: EAN13 formula shows "Invalid Ref" Error in Excel 2010

$
0
0

PRB: EAN13 formula shows "Invalid Ref" Error in Excel 2010

SYMPTOMS

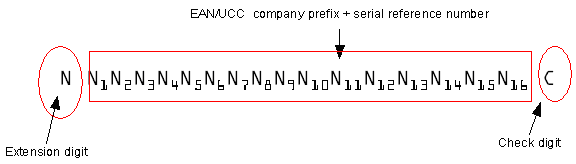
You imported Font Tools VBA module following the instructions at Tutorial: Using Barcode Fonts in Excel Spreadsheets. After you put formula =EAN13(E2) (here E2 is the reference to data cell), Excel gives #REF! error.

CAUSE

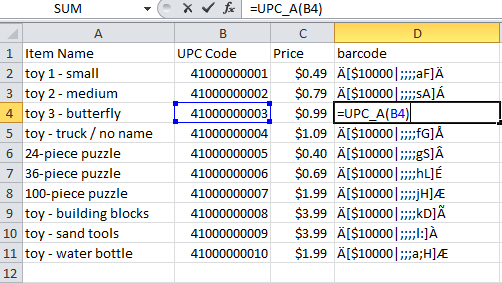
Excel 2010 increases the number of columns that it can address to 3-letter column names. As a result, names like EAN13 are treated as a cell reference: column EAN and row 13. The VBA function is never invoked.

RESOLUTION

There are two solutions to this name confliction issue.

  • Method I: Save the file in legacy Excel format (.xls), which is the format compatible with Excel 2003. The legacy format does not utilize 3-letter column names.

  • Method II: change the VBA function EAN13 to a different name such as EAN_13 so that it does not conflict with cell references; and update all formula definitions. This can be done by opening the VBA module in VBA Editor and performing a global search and replace.

Source Code Reference

If you takes the method II approach, you can copy the code below and replace EAN13 function in VBA Editor. To open VBA Editor, click on Developer tab and click on Visual Basic tool button. If you did not see the Developer tab, see http://www.barcodeschool.com/2011/01/display-developer-tab-in-word-20072010/.

Public Function EAN_13(inpara As String) As String
Dim i As Integer
Dim checkDigit As Integer
Dim charToEncode As String
Dim symbmod As String
Dim symset As String
Dim symPattern As String
Dim charSet As String
Dim strSupplement As String
Dim charPos As Integer

charSet = "0123456789|"
inpara = maskfilter(inpara, charSet)
charPos = InStr(1, inpara, "|", 0)

If charPos > 0 Then
    strSupplement = UPC25SUPP(Right(inpara, Len(inpara) - charPos))
    inpara = Left(inpara, charPos - 1)
End If
If Len(inpara) < 12 Then
    While Len(inpara) < 12
        inpara = inpara + "0"
    Wend
ElseIf Len(inpara) > 12 Then
    inpara = Left(inpara, 12)
End If

Select Case Mid(inpara, 1, 1)
Case 0: symbmod = "AAAAAA"
Case 1: symbmod = "AABABB"
Case 2: symbmod = "AABBAB"
Case 3: symbmod = "AABBBA"
Case 4: symbmod = "ABAABB"
Case 5: symbmod = "ABBAAB"
Case 6: symbmod = "ABBBAA"
Case 7: symbmod = "ABABAB"
Case 8: symbmod = "ABABBA"
Case 9: symbmod = "ABBABA"
End Select

EAN_13 = textOnly(Mid(inpara, 1, 1)) + "["

For i = 2 To 7
    symPattern = Mid(symbmod, i - 1, 1)
    If symPattern = "A" Then
        EAN_13 = EAN_13 + convertSetAText(Mid(inpara, i, 1))
    ElseIf symPattern = "B" Then
        EAN_13 = EAN_13 + convertSetBText(Mid(inpara, i, 1))
    End If
Next i
EAN_13 = EAN_13 + "|"
For i = 8 To 12
    EAN_13 = EAN_13 + convertSetCText(Mid(inpara, i, 1))
Next i
checkDigit = getUpcGeneralCheck(inpara)
EAN_13 = EAN_13 + convertSetCText(checkDigit) + "]"

If strSupplement <> "" Then
    EAN_13 = EAN_13 + " " + strSupplement
End If
End Function
            

APPLIES TO

  • UPC/EAN Fonts 3

  • Microsoft Excel 2010


Serial Shipping Container Code (SSCC-18)

$
0
0

Serial Shipping Container Code (SSCC-18)

The Serial Shipping Container Code (SSCC) is used throughout the supply chain as an entity identifier for item tracing and internal control. It is the only mandatory field on a GS1 logistics label.

SSCC contains 18 digits started with an extension digit and ended with a check digit. The check digit is calculated according to the GS1 mod10 algorithm (the same algorithm that calculates UPC-A/EAN-13 check digits). An online check digit calculator is provided here.

Figure 1. SSCC-18 number structure

SSCC-18 number structure

A SSCC number has the following structure:

  1. The first digit is extended digit and assigned by the company. For historical reasons 0 is used to indicate that the container is a case or carton.

  2. The next 16 digits are the manufacturer code, followed by the serial number of this container. The manufacturer code (or company code) is assigned by GS1 (formerly known as UCC/EAN organization). The serial number identifies this merchandise container and assigned by the manufacturer. The manufacturer should not reuse the serial number within a certain time frame, for example, 1 year.

    The company code normally comprises 7 or 8 digits. Therefore, the serial number can be 9 or 8 digits.

  3. The SSCC-18 check digit. Do not confuse it with Code128 check digit. The check digit is to ensure that the data is correctly entered. It is part of the data encoded into the barcode. A receiving system is required to validate this check digit, so you should get it correct at the first place.

For each carton/pallet tracked, a unique SSCC is required. An ASN (Advance Ship Notice) may contain multiple SSCCs.

Barcode

The SSCC is usually coded with GS1-128 symbology. The Application Identifier (AI) for this type of barcodes is 00. Below shows an example SSCC-18 barcode (created with Monterey Barcode Creator 3.3).

Figure 2. An example SSCC-18 barcode

An example SSCC-18 barcode

The spaces in human readable text are not required but highly recommended because they help to identify the different parts of the number. In the example above, the 18 digits are divided into four parts:

  • 0 is the package type - a carton.

  • 0718908 is the manufacturer code assigned by GS1.

  • The following part is the serial number for this merchandise container (562723189).

  • At the end of this number is the check digit (6).

The barcode can also be created with Code128 Fontware. If you want to add SSCC-18 printing functionality into your program, consider Morovia Barcode ActiveX.

SSCC barcode is the most critical part in a GS1-compliant shipping container label. A shipping container label may contain other barcodes and text information, such as postal code, store # and PO number. You might want to read this article for more information on creating a shipping container label.

Check Digit Calculation

SSCC check digits are calculated the same way as UPC-A/EAN-13 check digits. Here are the steps to calculate SSCC-18 check digits:

  • From the right to left, start with odd position, assign the odd/even position to each digit.

  • Sum all digits in odd position and multiply the result by 3.

  • Sum all digits in even position.

  • Sum the results of step 3 and step 4.

  • Divide the result of step 4 by 10. The check digit is the number which adds the remainder to 10.

A web-based free utility to calculate SSCC check digit can be found here.

Tutorial: Creating barcode labels with Microsoft Word Mail Merge

$
0
0

Tutorial: Creating barcode labels with Microsoft Word Mail Merge

Using Morovia barcode fonts and included VBA module, you can easily create barcode labels. The linear font VBA module provides encoding functions for the following barcode formats: Code 39, UPC-A, UPC-E, EAN-13, EAN-8, Code 93, Code128, EAN-128, Codabar, POSTNET, Royal Mail, and Interleaved 2 of 5. VBA modules for other types of barcodes are included in the product packages.

This tutorial assumes that you are running a retail store and need to assign UPC-A codes for items that do not have barcode on the box. Generally speaking you can assign UPC codes that started with digit 4 for your own warehouse use. You can find more information at UPC-A Specification.

Assuming that the item list is store in an Excel spreadsheet, as below:

  1. Step 1. Prepare the data source. Follow the instructions in Tutorial: Using Barcode Fonts in Excel Spreadsheets to import linear barcode font VBA module to Excel.

  2. Step 2. In Microsoft Word, Open the Mailings tab and click on Start Mail MergeLabels...

  3. Step 3. Select the label format you'd like to use. Here we use Avery 5163 Shipping Labels.

  4. Step 4. click on Select RecipientsUse Existing List... Navigate to the spreadsheet we just created.

    click OK to select Sheet1 (the default).

  5. Step 5. click on Insert Merge Field to insert the fields that appear on the label. Layout them accordingly.

  6. Step 6. Highlight barcode field, and choose Font. Change the font to MRV UEBMA, 12 points. Click on Update Labels to transfer the settings to other labels.

  7. Step 7. Click on Preview results to view the merge results. You can print the labels out. If you changed values of some records, added or inserted records, the word document will reflect the changes.

Adding DataMatrix barcodes to Crystal Reports

$
0
0

Adding DataMatrix barcodes to Crystal Reports

Introduction

Conceptually using two dimensional barcode fonts with Crystal Report is no different than using other fonts. In practice, there are a couple of issues need to work out. The major issue associated is the length limit imposed by Crystal Reports: no formula field can have more than 255 characters.

To add DataMatrix barcodes to Crystal Report, you need to use Morovia 2D Fontware UFL. Native Crystal Reports formula is not supported.

Warning

The method described in this KB article applies on DataMatrix Fontware version 3.x only. For DataMatrix Font & Encoder 5, see DataMatrix Font & Encoder 5 Reference Manual.

Installing UFL

We use Crystal Reports version 9 for tutorial. If you are working on an earlier version the steps outlined still apply. You are authorized to use the UFL provided by Morovia for free as long as you own a perpetual license. You are also allowed to distribute this UFL with your application with a developer license.

The DataMatrix UFL component is included in every DataMatrix Fontware package. There is no separate download of this UFL component. If you posses a valid license to any of 2D barcode font but can not locate this component, write to to request one.

The UFL functions are automatically available to Crystal Reports once the component is installed in your computer. The following functions are added to Crystal Reports:

Table 1. DataMatrix UFL Functions

Function Description
MoroviaDataMatrixEncode Encode the data into an array of barcode string separated by line feed and carriage return between two adjacent lines.
MoroviaDataMatrixEncode2 Similiar with MoroviaDataMatrixEncode function, but offers more options. You can specify the target size and line separator with this function.

Both function takes a parameter called trunk_no. Because Crystal Reports do not allow any formula fields having more than 255 characters, you need to call multiple times of encoding functions to receive different trunks of the result. The trunk_no starts from 1. Each trunk holds 200 characters.

Working with Crystal Reports

In the following tutorial we will start with a blank report. In the report we created several database fields. We want to be able to encode the data field of a table.

  1. First we switch to the design view. This can be done by choosing ViewDesign (Ctrl+D)

  2. Now choose ViewField Explorer to have Field Explorer appear at the right side of the work space.

  3. We are now ready to add the barcode field. Right click the Formula Fields to have the context menu pop up. Choose New...

  4. Give a name to this new filed. In our case we simply call it barcode_trunk1.

  5. Click on the Use Editor button. The Formula Editor pops up. Find Morovia barcode functions under the Additional Functions+Visual Basic 2000 Functions section. If you can not find such an item, most likely you probably need to check your computer to see why the file is missing. Restart Crystal Report and repeat the steps above.

  6. Select the the function MoroviaDataMatrixEncode, double click it to make it appear in the bottom panel. Move the cursor in between the parentheses. Put the data field you want to encode. In our case, we put {TestData.Data} because that filed is what we want to present in barcode form. Note that this field must be a text string. You can use Crystal Reports function ToText to convert other format into text string. Move the cursor to the next field, and type 1.

  7. Dismiss the Formula Editor and return to the Field Explorer dialog.

  8. Based on the calculation from the GUI Encoder, we know that it takes about 700 characters for the result. Thus we need four trunks to hold all the barcode string. We repeat the steps above and add another formula field barcode_trunk2. Repeat the steps above to add fields barcode_trunk3 and barcode_trunk4.

  9. Add a text field to the report. You can do this by selecting the text field from toolbar the dragging it to the report.

  10. Click on the text field to select it. From the Field Explorer, drag and drop the formula field, barcode_trunk1 into the text field.

  11. Drag and drop barcode_trunk2 to the same text field. Crystal Reports puts {@barcode_trunk1}{@barcode_trunk2}{@barcode_trunk3}{barcode_trunk4} into the text field.

  12. Format the text field with MRV DataMatrix font. To do this you can right click the text field and select format text... menu item.

  13. Click on the Preview tab. The barcodes should appear. We have successfully build a report with barcode in minutes! During the encoding process, a dialog pops up to remind you that you are using a trial version of the software, and each symbol contain additional text "DEMO". This limitation will go away once you purchase the retail version.

Distributing UFL, Fonts with Your Report

Once you finish the report design, you can distribute your report application with Crystal run time files, barcode fonts and the UFL library.

License

First you must obtain a valid license from Morovia Corporation. You can either purchase single user license for every computer you are going to install; or purchase a Corporate license if you have a large install base within your organization. If you want to distribute outside your company, a developer license must be obtained.

File List

There are four runtime files needs to be included in the installer:

  • Morovia Barcode Font Files. The font files can be located at Fontware folder under c:\program files\morovia directory.

  • Morovia 2D Barcode Fontware Crystal UFL. This file contains all the 2D barcode font encoder for Crystal Reports. This file is named cruflMrv2DSurrogate.dll, which can be found in system32 folder under Windows directory. Note that you must register the COM object in order to use it. The command line for registration is regsvr32 cruflMrv2DSurrogate.dll.

  • Morovia DataMatrix Font Encoder (ActiveX). This dll is normally located at c:\program files\morovia\DataMatrixFontware. Since it is an ActiveX, you need to register in the client machine before using it.

  • Crystal Runtime. The file name is U2lcom.dll. This file is required to work with COM UFLs.

HOWTO: Export Image to an IStream Object

$
0
0

HOWTO: Export Image to an IStream Object

SUMMARY

BarImageExport.zip is a Visual C++ 6.0 sample that demonstrates how to export image to an IStream object.

For performance or other reasons sometimes it is desirable to export the barcode image to the memory only as a stream of data.

MORE INFORMATION

In the IDL, ExportImage is defined as:

[HRESULT ExportImage(VARIANT Destination, 
    ImageFormatEnum ImageFormat);  

The interface function takes two parameters. The first one is a VARIANT and the second one is an interger indicating the image format. The first parameter can contain two types - if it is a string, the parameter contains the path to the destination file. If it holds an IUnknown pointer, it is treated as an IStream object.

This sample uses the following steps to export the barcode image:

  1. Calls CreateStreamOnHGlobal() to create a standard IStream object.

  2. Calls QueryInterface to retrieve the IUnknown pointer.

  3. ackages the IUnknown pointer into a VARIANT.

  4. Calls ExportImage to export the image into IStream object.

Code Hightlights

Creating Barcode Objects at Background

This step can be skipped if you create the Barcode ActiveX object in Visual Studio Form designer or other integrated programming environment.

//Create Morovia Barcode ActiveX object
CComPtr<IDispatch> spDisp;
HRESULT hr = spDisp.CoCreateInstance(L"Morovia.BarcodeActiveX");
if ( FAILED(hr) ) {
  cerr << _T("Failed to load Morovia Barcode ActiveX object.") << endl;
  cerr << _T("Please reinstall the ActiveX object using the installer provided")<< endl;
  cerr << _T("by Morovia Corporation.")<< endl;
  return -1;
}
cout << _T("Morovia Barcode ActiveX loaded succesfully.") << endl;  

Memory Stream

Create a standard memory IStream object and then retrieve its IUnknown interface.

CComPtr<IStream> spStream;
CreateStreamOnHGlobal(NULL, TRUE, &spStream);
CComPtr<IUnknown> spUnknown;
spStream->QueryInterface(&spUnknown); 

Exporting Image

HRESULT hr = _com_dispatch_method(spDisp, 1004, DISPATCH_METHOD, VT_EMPTY, 
(void*)(NULL), L"\x000D\x0003", spUnknown, 1); 

In this sample we use the IDispatch interface to invoke the function. If you have the IBarcode interface pointer, you may use IBarcode pointer which is simpler:

CComVariant streamVar( spUnknown);
CComQIPtr<IBarcode> spBarcode(spDisp);
spBarcode->ExportImage(streamVar, 1); 

The integer 1 indicates we ask for the JPEG format. For the list of image formats supported by the control, refer to the Barcode ActiveX Reference Manual.

REFERENCES

APPLIES TO

  • Morovia Barcode ActiveX 3

Font size decreases when exporting to PDF (Crystal Reports)

$
0
0

Font size decreases when exporting to PDF (Crystal Reports)

Symptom: When exporting or scheduling to Adobe Acrobat Portable Document Format (PDF), the font size is reduced in the exported document. As a result, the barcode is too small to be recognized by a scanner.

Note

For Crystal Reports XI (11 or 11.5), see KB10054.

Resolution

This is a known issue with Crystal Reports which reduces the font size when it exports to a PDF file. The solution below is retrieved from Business Objects support site.

This known issue has been assigned Track ID ADAPT00145285, and affects the following:

  • Crystal Reports (CR) 10

  • Crystal Enterprise (CE) 10

  • Crystal Reports (CR) 9

  • Crystal Enterprise (CE) 9

  • Crystal Reports for Visual Studio 2005

  • Crystal Reports for Visual Studio .NET (CR for VS .NET) 2003

If the update does not fix the issue, try increasing the font size to compensate the loss during the export.

Crystal Reports 10

For Crystal Reports 10, the update for this issue is available at ftp://ftp1.businessobjects.com/outgoing/EHF/dbex10win_en.zip. Note: link is no longer valid, please follow the instructions below to manually edit registry.

This issue is addressed in the following components (and later versions):

  • Crxf_pdf.dll, version 10.0.5.598, dated 8/19/2004

  • Crxf_pdf_res_en.dll, version 10.0.5.598, dated 8/19/2004

With the update(s), the following registry subkey is added to override this behavior:

HKCR\SOFTWARE\Crystal Decisions\10.0\Crystal Reports\Export\PDF

By setting the value of ForceLargerFonts entry to 1, the font size is maintained.

Crystal Enterprise 10

For Crystal Enterprise 10 for Windows, the update for this issue is available at ftp://ftp1.businessobjects.com/outgoing/EHF/dbex10win_en.zip Note: link is no longer valid, please follow the instructions below to manually edit registry.

This issue is addressed in the following components (and later versions):

  • Crxf_pdf.dll, version 10.0.5.598, dated 8/19/2004

  • crxf_pdf_res_en.dll, version 10.0.5.598, dated 8/19/2004

With the update(s), the following registry subkey is added to override this behavior:

HKCR\SOFTWARE\Crystal Decisions\10.0\Crystal Reports\Export\PDF

By setting the value of ForceLargerFonts entry to 1, the font size is maintained.

Crystal Reports 9

For Crystal Enterprise 9 for Windows, the update for this issue is available at the following location: ftp://ftp1.businessobjects.com/outgoing/EHF/ce90dbexwin_en.zip. Note: link is no longer valid, please follow the instructions below to manually edit registry.

After applying this update, complete these steps:

  1. Create the following registry entry: HKEY_LOCAL_MACHINE/Software/Crystal Decisions/9.0/Crystal Reports/Export/Pdf/ForceLargerFonts.

  2. Set the registry entry value to 1 to maintain the font size.

Crystal Enterprise 9

For Crystal Enterprise 9 for Windows, the update for this issue is available at the following location: ftp://ftp1.businessobjects.com/outgoing/EHF/ce90dbexwin_en.zip. Note: link is no longer valid, please follow the instructions below to manually edit registry.

After applying this update, complete these steps:

  1. Create the following registry entry: HKEY_LOCAL_MACHINE/Software/Crystal Decisions/9.0/Crystal Reports/Export/Pdf/ForceLargerFonts.

  2. Set the registry entry value to 1 to maintain the font size.

Crystal Reports for Visual Studio .NET 2003

For Crystal Reports for Visual Studio .NET 2003, there is no file update to correct this issue.

The following are two possible workarounds:

  1. Design the report with a larger font size to compensate for the font size decrease in the exported PDF file.

  2. Programmatically increase the font size of the report prior to exporting in the application.

For a code example of this workaround, go to http://www.sdn.sap.com/irj/scn/advancedsearch?query=boj and search for knowledge base article 1219570.

Note: this issue will occur after installing the Hot Fix CR 1.1 .NET Patch for VS .NET 2003 (cr11netwin_en.zip). This Hot Fix will update the file crxf_pdf.dll to resolve the issue assigned Track ID ADAPT00102129.

For more information, go to http://www.sdn.sap.com/irj/scn/advancedsearch?query=boj and search for the following SAP Notes: 1214887, 1214975.

Additional Notes

If you use registry fix and only the key under HKEY_CURRENT_USER is updated, the change won't apply if the Crystal reports runtime runs under a different account. This is the case when you run Crystal Reports under IIS. You will need to apply the registry change to that account as well. Follow the steps below:

  1. Start Task Manager and determine the account that runs the host process. For example, for IIS6 the process is w3wp.exe.

  2. Start Registry Editor and navigate to HKLM\SOFTWARE\Microsoft\Windows NT\CurrentVersion\ProfileList. Inspect each profile and you should see a list of SIDs started with S-1-5. Look at value of ProfileImagePath to determine the corresponding SID of the security account.

  3. Go to the following registry sub key HKEY_USERS[your security profile]\Software\Crystal Decisions\10.2\Crystal Reports\Export\Pdf.

  4. Right-click the sub key and click New > DWORD Value. Name the DWORD value ForceLargerFonts and set it to the value of 1.

GS1 128 in USPS Confirmation Service

$
0
0

GS1 128 in USPS Confirmation Service

Overview

USPS confirmation services uses UCC/EAN128 barcodes to uniquely identify mail pieces and to designate the type of services requested. This barcode encodes the Package Identification Code (PIC), commonly referred as a tracking number. With Morovia U.S. Postal Fontware, you are able to produce such barcode in your own shipping labels in minutes.

This article is based on USPS Publication 91, published in May 2008.

Package ID

The confirmation services use a 20-digit package ID which can be further divided into four parts:

  1. Service Type Code - 2-digit

  2. Customer ID - 9-digit DUNS Number

  3. Sequential Package ID - 8-digit

  4. Check Digit - Mod 10

Service Type Code (STC)

Service Type Code are 2-digit designators to represent Postal Service Classes of mail in conjunction with the postal service being requested. The detailed list of STC codes can be located in USPS publication 91, pages 68-70.

Dun & Bradstreet Number (DUNS)

The DUNS uniquely identify a business at specific geographical locations. If you want to do business with U.S. government you need to have a DUNS number. The DUNS can be obtained via Internet at www.dnb.com.

Sequential Package ID

Customers assign an 8-digit sequential package identifier. This string of numbers can be a variable length field of 2-8 digits.

Check Digit

he check digit is appended at the end of the number to validate the authenticity of the number. The value of the check digit is that when added to the sum of other digits in the barcode, results in a total that is multiple of 10. For example in the diagram above, the check digit for 91801 is 1 since 9+1+8+0+1+1=20 which is two times of 10.

GS1-128 Barcode

The barcode uses EAN128 symbology. The Application Identifier in this case is 91. If you are familiar with Code128C, it is not difficult to find out the barcode is composed with six parts:

  1. Start character (START-C)

  2. GS1-128 Indicator - FNC1

  3. Application Identifier, in our case, 91

  4. 20-digit Package ID, including the check digit

  5. Code128 Checksum character

  6. Stop Character (STOP-C)

The AI and Package ID are required to be printed underneath of the barcode per USPS requirement.

The function to calculate checksum digit for package ID, as well as the complete barcode string for USPS confirmation services is included in Morovia Font Tools, which is included in Morovia U.S. Postal Fontware.

Print Requirement

The text above the barcode code must read as appropriate: "USPS DELIVERY CONFIRMATION", "USPS SIGNATURE CONFIRMATION", etc. The font must be sans serif bold. And the size must be at least 12 points. (14-point type preferred).

The human readable text representing the barcode must be placed below the quiet zone of the barcode, and must be printed with a sans serif bold with minimum point size 10. The AI 91 must be printed at the beginning of the human readable text.

Two identification bars with at least 0.062" thick must appear between 0.125 inch and 0.5 inch above and below the human readable text and numbers to distinguish the Confirmation Services bar code from other information on the shipping label.

Concatenated Barcode with ZIP Code

The USPS Confirmation barcode can be concatenated with another GS-128 barcode with ZIP code encoded. For more information, se KB10049.

Segments per Row Selection in DataBar Coupon Barcode

$
0
0

Segments per Row Selection in DataBar Coupon Barcode

The new databar coupon code, introduced by GS1 US, enters into circulation. The code can encode a lot of data, ranging from 25 to 39 digits. However, the printing requirement calls for the barcode to be printed in 2 rows only. The databar specification, on the other side, specifies SegmentPerRow property for databar stacked barcodes. Our software follow this convention.

Our programmer wrote a small program to find out the correlation between number of digits (the data portion) and the SegmentsPerRow. The result is listed below. The table below only lists the value that you should use to print 2-row Databar stacked barcodes. If you want to print 3 or more rows, visit the original paper.

Table 1. SegmentPerRow Selection Table

Data Length SegmentsPerRow
25 6,8
26-32 6,8,10
33-39 8,10,12


EAN-13 Specification

$
0
0

EAN-13 Specification

EAN is designed by the International Article Numbering Association (EAN) in Europe. It is an extension to UPC-A to include the country information. The only difference between UPC-A and EAN-13 is that the number system in UPC-A is a single digit from 0 through 9 whereas an EAN-13 number system consists of two digits ranging form 00 to 99.

EAN-13 encodes 12 digits of numeric data along with a trailing check digit, for a total of 13 digits of barcode data.

Structure of an EAN number

An EAN-13 number consists of four areas: (1) The number System; (2)The manufacturer code; (3) the product code; (4)The check digit. Normally the number system digit is printed to the left of the barcode, and the check digit to the right. The manufacturer and product codes are printed just below the barcode, separated by the guard bar.

  • Number System. The number system is the first two digits in the EAN number to identify the country/region numbering authority. The number system list is maintained by GS1 organization (http://www.gs1.org).

  • Manufacturer Code. The manufacturer code is a unique code assigned to each manufacturer by the numbering authority indicated by the number system code. All products produced by a given company will use the same manufacturer code.

    GS1 uses what is called variable-length manufacturer codes. The lengths generally vary between manufacturers.

  • Product Code. The product code is assigned by the manufacturer. The product code immediately follows manufacturer code. The total length of manufacturer code plus product code must be exact 10 digits.

  • Check Digit: The check digit is used to verify that the barcode is generated or scanned correctly. The check digit is calculated based on the rest of the barcode digits.

Variants

  • JAN. Japan's numbering system is 49. The EAN numbers with numbering system 49 are called JAN.

  • Bookland. The bookland barcode is an EAN-13 barcode that follows a specific format used exclusively with books (all bookland barcodes start with 978).[1]

Check Digit Calculation

UPC-A check digit is calculated using standard Mod10 method. Here outlines the steps to calculate UPC-A check digit:

  1. From the right to left, start with odd position, assign the odd/even position to each digit.

  2. Sum all digits in odd position and multiply the result by 3.

  3. Sum all digits in even position.

  4. Sum the results of step 3 and step 4.

  5. divide the result of step 4 by 10. The check digit is the number which adds the remainder to 10.

A web-based free utility to calculate UPC-A check digit is available at http://www.morovia.com/education/utility/upc-ean.asp.

Encoding

A EAN-13 symbol can be divided into two halves, each consisting of six digits separated by a center guard bar pattern. The whole symbol is surrounded by two guard bar patterns. The same digit has different encoding depends whether it is in the left halve or in the right halve. The encoding pattern for digits in the left halve always starts with a space while the one for digits in the right halve always start with a bar and ends with a space.

A EAN-13 symbol has the following structure:

  1. Start guard bars, always with a pattern bar+space+bar.

  2. Left halve, six digits encoded using the encoding schema A or B;

  3. Center guard bars, with a pattern space+bar+space+bar+space.

  4. Right halve, six digits encoded using the encoding schema C.

  5. Stop guard bars, always with a pattern bar+space+bar.


[1] Traditionally books are identified by their 10 digit ISBN numbers which can be converted to EAN-13 by adding 978 prefix. Now book industry uses EAN-13 numbers exclusively with leading prefixes 978 or 979. See ISBN-13 announcement.

UPC-E Specification

$
0
0

UPC-E Specification

UPC-E is the short form representation of a UPC-A number. It reduces the data length from 12 digits to 6 digits by compressing the extra zeros. It is suited for identifying products in small packages.

A UPC-E number has 6 digits with number system either 0 or 1. The first 5 digits are calculated based on a conversion algorithm described below. The last digit is the check digit of the original UPC-A symbol.

Conversion between UPC-A and UPC-E

Not all UPC-A numbers can be compressed to UPC-E. These codes who have a corresponding UPC-E code must have at least 4 zeros. The rules are:

  1. If the manufacturer code ends with 000, 100, or 200, the UPC-E code consists of the first two characters of the manufacturer code, the last three characters of the product code, followed by the third character of the manufacturer code. Under this case, The product code must be 00000 and 00999.

  2. If the manufacturer code ends with 00 but does not meet the #1 requirement, The UPC-E code consists of the first three characters of the manufacturer code, the last two characters of the product code, followed by digit “3”. The product code can only contain two digits(00000 to 00099).

  3. If the manufacturer code ends in 0 but non of the above qualifies, the UPC-E consists of the first four digits manufacturer code and the last digit of the product code, followed by the digit “4”. The product code in this case can only contain one digit(00000 to 00009).

  4. If the manufacturer code ends with non-zero digit, the UPC-E code consists of the manufacturer code and the last digit of the product code. In this case the product case can only be one from 00005 to 00009 because 0 to 4 has been used for the above four cases.

You can use this web-based free utility to perform conversion.

Check Digit Calculation

The UPC-E check digit is the same check digit of its corresponding UPC-A number. Therefore, to calculate the check digit of a UPC-E number, first convert it to UPC-A, then calculate the check digit using the algorithm described in UPC-A specification.

Encoding

A UPC-E symbol has the following structure:

  1. Start guard bars, always with a pattern bar+space+bar.

  2. Left halve, five digits calculated from the equivalent UPC number.

  3. Check digit.

  4. Stop guard bars, always with a pattern bar+space+bar.

Code 25 Specification

$
0
0

Code 25 Specification

Standard 2 of 5 was invented in early 1960s. Since then it has been widely used in warehouse, photo finishing and airline industries. It is also called industry 2 of 5.

Standard 2 of 5 is a numeric symbology and its character set includes 10 digital characters: 0, 1, 2, 3, 4, 5, 6, 7, 8, 9.

The symbology receives this name because every character is encoded with 5 bars where 2 bars are wide. Code25 only uses bar width to encode the data. Interleaved 2 of 5, however, uses both widths of bars and spaces.

A complete Standard 2 of 5 barcode must include a start character and a stop character. Optionally it ends with a modulo 10 check digit.

Standard 2 of 5 is a very simple and low density symbology. Its variant, Interleaved 2 of 5 (ITF25), has a slightly higher density.

Variants

  • Industry 2 of 5 – Identical to Standard 2 of 5.

  • Standard 2 of 5 Mod 10 – A modulo 10 check digit is appended to the barcode message to perform checking.

Structure of a Code25 symbol

A typical Code25 barcode has the following structure:

  • A start character

  • Message encoded

  • Optional Mod 10 check digit

  • A stop character

Check Digit Calculation

  1. Start with the right-most digit in the message; mark the character with even and odd position. The right-most digit has the even position.

  2. Sum all digits in the odd position.

  3. Sum all digits in the even position, and then multiply by 3.

  4. Add the result 2 and result 3.

  5. Divide the result of step 4 by 10, the check digit is the result equal to that 10 minus the remainder. In the case the the remainder is 0, the check digit is 0.

EAN-8 Specification

$
0
0

EAN-8 Specification

EAN-8 is the short version of EAN-13, the same as UPC-E vs. UPC-A. While they looks very similar, some differences exist. UPC-E does not explicitly encode the first digit(NS) while EAN-8 encodes all 8 digits. That also means that EAN-8 is not compatible with UPC-E from encoding and decoding perspective. Moreover, a UPC-E number can be converted back to UPC-A; however there is no defined method for conversions between EAN-13 to EAN-8.

An EAN-8 number contains 7 digits of message plus 1 check digit. The first two or three digits identify the numbering authority; the remaining 4 or 5 digits identify the product. You must apply the EAN-8 number separately from the numbering agency responsible for your country or region.

Check Digit Calculation

The EAN-8 check digit is calculated using modulo 10 method. Here outlines the steps to calculate EAN-8 check digit:

  1. From the right to left, start with odd position, assign the odd/even position to each digit.

  2. Sum all digits in odd position and multiply the result by 3.

  3. Sum all digits in even position.

  4. Sum the results of step 3 and step 4.

  5. Divide the result of step 4 by 10. The check digit is the number which adds the remainder to 10.

A web-based free utility to calculate UPC-A check digit is available at http://www.morovia.com/education/utility/upc-ean.asp.

Encoding

The encoding of an EAN-8 symbol uses all three two character set. An EAN-8 symbol has the following structure:

  1. Start guard bars, always with a pattern bar+space+bar.

  2. Two number system characters, encoded with character set A.

  3. The following two characters, encoded with character set A.

  4. Center guard bars, with a pattern space+bar+space+bar+space.

  5. Last three characters, encoded in character set C.

  6. Stop guard bars, always with a pattern bar+space+bar.

Basic Barcode Terms Explained

$
0
0

Basic Barcode Terms Explained

What is Symbology?

Symbologies are the schema how the data is encoded into physicals bars and spaces. Symbology is analogous to the language. The reading and printing equipments must use the same language to communicate with each other, this language is called symbology.

Generally speaking, symbologies can be divided into two major categories: width-modulated and height-modulated. Except these used in postal applications, most symbologies encode the data into the different width of the bars. All the bars have the same height. The contrary holds true for height-modulated symbologies: all bars have the same width, and the data is encoded into different length of the bars.

We call the data to encoded message or code. When we talk about the physical representation of the message, we refer as symbol or barcode in this web site.

You can find a list of barcode glossary in the support section.

Symbology Configurations

The symbology configuration refers to the shape of a symbol. There are three major configurations: linear, 2D stacked and 2D matrix. The linear symbology is most widely used, consisting only one row of bars and spaces. The 2D stacked symbol uses multiple rows of bars and spaces. Each row in a 2D stacked symbol has the same height. 2D matrix symbol uses both width and height to encode the data.

Figure 1. Linear Barcode

Linear Barcode

Figure 2. 2D Stacked Barcode

2D Stacked Barcode

Figure 3. 2D Matrix Barcode

2D Matrix Barcode

Character Set

The character set defines what kind of data the symbology encodes. Generally there are three types of character sets: numeric, alpha-numeric and full ASCII. Some symbologies can encode arbitrary binary data. Not all alpha-numeric symbologies share the same character set. Most alpha-numeric symbologies can only encode several characters in addition to letters and numbers.

Discrete/Continuous

In a discrete symbology, each character ends with a bar and an inter-character gap separates two adjacent characters. Each character is treated separately, no end characters are required for scanning.

In a continuous symbology, there is no inter-character gap and each character terminates at the starting bar of the next character. Hence, a stop character is usually needed. Continuous symbologies usually encode more information than the discrete symbologies.

Figure 4. 2D Matrix Barcode

2D Matrix Barcode

Fixed/Variable Length

Some symbologies can encode only certain length of data. For example, UPC only accepts 11 digits and Code39 encodes any length of data.

X Dimension

X dimension describes the nominal width of the narrowest elements (both bars and spaces). For 2D matrix symbologies, X refers to the nominal dimension of the smallest data cell.

The X dimension largely decides the barcode density (how many characters can be encoded in one inch). The resolution of a barcode readers is also measured by the X-dimension that the reader can recognize. A high resolution barcode scanner can recognize a barcode with X dimension at 5 mils.

The linear barcode symbols in an open system usually have a X dimension equal to 10 mils. Two dimensional barcodes usually have a higher X dimension at 20 mils.

Wide-to-Narrow Ratio (N)

Most linear symbologies employs two widths, one for the wide element and one for narrow element. The ratio between the wide element and the narrow element is called N. N typically have a value ranging from 2.0 to 3.0. The large the N is, the allowable printing tolerance increases. N also slightly impact the density of a symbol.

Self-Checking

If a single printing defect will not cause a character to be recognized as another one, the symbology is regarded as self-checking. A non-self-checking symbology usually has a check character to make sure that the error is detected.

Start/Stop Character

Start/Stop character is placed to indicate where the barcode symbol starts and ends. It also indicates the scanning direction in some symbologies.

Quiet Zone

Quiet zone refers to the spaces around the barcode that must contains no dark marks. Most of symbology requires quiet zone preceding and following barcode.

Morovia Font Tools Overview

$
0
0

Morovia Font Tools Overview

Using barcode fonts to create barcode involve two distinct steps. The fist step is Encoding, which returns a string from the input. The second step is to format the barcode string with an appropriate font. Unfortunately, in most cases you can't just enter the number and format with the font to create a valid barcode, due to the extra overhead required for a barcode:

  • Many barcodes require start/stop characters to indicate to the scanner where the barcode starts and ends.

  • Some symbologies require extra check characters at the end of message to ensure a misread does not happen.

  • In Some symbology the same digit may have several representations depending on its location.

  • Some symbologies encode control characters, which are supported by most software. They have to be mapped to extended characters.

To assist our customers automate the barcode creation process, we provide a collection of utilities, web utilities, source code named Morovia Font tools collectively. Morovia Font Tools are included in every Fontware package; and they can also be downloaded and upgraded separately. The contents of Morovia Font Tools include:

  • Morovia Fontpal. Fontpal is a GUI program running on Windows 2000 and above.Fontpal generates the correct string based on the symbology you choose and the message you want to encode. Fontpal also lets you visually inspect the barcode you are going to create, so you have an idea of the barcode image you are going to create - this is especially useful if you are going to create a barcode symbol without the underlying text.

  • Language Tools. Language tools include source code written in major programming languages enabling customer integrate the barcode font with applications. Currently we have language tools for Visual Basic, VBScript, Crystal Reports UFL, Crystal Report Formula, C/C++ and JavaScript.

  • Morovia Fontpal Web Utility. With this web utility you can generate barcode strings from a computer that has Internet access. If you browse the page from Windows with Microsoft Internet Explorer, you can view the generated barcode symbol at the same time.

You can find contents of Font Tools under c:\program files\common files\morovia\moroviafonttools directory.

Note

Some functions, notable Code128Ex and EAN128Ex, are provided from Windows DLL interface due to their complicated implementation. It is encouraged to use Windows DLL in your program - because it is easy to upgrade should a bug is discovered. In many other Morovia font programs, such as PDF417 Fontware and DataBar Fontware, only DLL interface is provided.

For encoder functions for 2D barcode fonts and DataBar fonts, refer to the product manuals.

For your convenience, you can also view them online here:

Function Prototypes

The table below lists all the functions we support in the language tools. All functions take one input parameter - the data encoded. If input contains characters which can not be encode with the indicated symbology, these characters will be filtered out. If a symbology required fixed length of the input string, the excess will be truncated if the input's length exceeds the required length; or zeroes are appended to the end of the input if too short.

Table 1. Linear Barcode Font Encoder Functions

Function Details Product to Apply
Code39(text) Converts the input text into a Code 39 barcode string. The function throws off characters not in the Code 39 character set, and adds start/stop characters. Code39 Fontware
Code39Mod434 Converts the input text into a Code39 barcode string with Mod 43 check character. The function throws off characters not in the Code 39 character set, calculates the mod 43 check character, and adds start/stop characters.
Code39Ascii(text) Converts the input text into a Code39 extended symbol. This function should be used to format Morovia code39 font, not Code39 full ASCII font. The text can be any combinations of ASCII characters. Note that the symbol generated is extended Code39 type, and the scanner must be put in Code39 extended mode to read the symbol properly.
Code39Extended(text) Converts the input text into a Code39 extended symbol. It accepts any ASCII characters as input. The only difference from function Code39Ascii is the former is designed to work with Morovia Code39(Full ASCII) font and the latter is designed to work with Morovia Code39 font. Code39 (Full ASCII) Fontware
Code93(text) Converts the input text into a Code93 barcode string. It accepts any ASCII character input, taking care of the check character calculation and adding start/stop characters into the string. Code93 Fontware
EAN13(text) Converts the input text into an EAN barcode. Accepts input of 12 digits of numeric data. UPC/EAN/Bookland Fontware
EAN8(text) Converts the input text into an EAN-8 barcode. Accepts input of 7 digits of numeric data.
UPC_A(text) Converts the input text into a UPC-A barcode. Accepts input of 11 digits of numeric data.
UPC_E(text) Converts the input text into a UPC-E barcode. Accepts input of 6 digits of numeric data.
Bookland(text) Converts a 10-digit ISBN string into a Bookland barcode string.[a]
Postnet(text) Converts the input into a valid POSTNET barcode string with checksum. The function adds the start/stop frame bar, calculates the check digit and forms the correct symbol. U.S. Postal Fontware
USPS_EAN128(text) Used for 22 digit USPS special services labels such as delivery confirmation in EAN128. This function takes 19 digit input which is made up of the three parts: 2 digit service code, 9 digit customer ID and 8 digit sequential package ID. This function calculates the check digit (Mod10), adds the application identifier 91 as required by the USPS standard, and format the data with EAN128 standard.
Code128A(text) Accepts the input of character set A. Code128 character set consists of capital letters and control characters. Code128 Fontware
Code128B(text) Accepts the input of character set B. Code128 character set consist of all printable character s in the ASCII table.
Code128C(text) Code128 character set C only contains numeric characters. Used when the encoded data containing only numbers.
Code128Ex(text) Encodes any single-byte characters. It automatically adjusts character sets internally to create shortest barcode possible. See KB10048 for details. Note - this function is available through Windows DLL and COM interface only. No source code is available.
EAN128Ex(text) Use this function for UCC/EAN-128 applications when you have already generated MOD10 check digit if required. FNC1 automatically included after start digit. You need to supply the combination of AI and data as the input parameter. See KB10048 for details. Note - this function is available through Windows DLL and COM interface only. No source code is available.
SCC14(text) Accepts 13 digits input and generates the complete barcode sting for SCC14. This function will calculate the SCC-14 check digit, append the application identifier 01, and encode the data with Code128C.
SSCC18(text) Accepts 17 digits input and generates the complete barcode \ string for SSCC18. This function will calculate the check digit, append the application identifier 00, and encode the data with Code128C.
RoyalMail(text) Converts the input into a valid UK royal mail barcode string with checksum. The function adds the start/stop frame bar, calculating the check digit and forms the correct symbol. RoyalMail Fontware
Codabar(text) Converts the input into a valid Codabar symbol. The default start/stop characters are A and B. Codabar Fontware
Code25(text) Returns the barcode string that becomes a valid code25 barcode after being formatted with code25 font. This function does not append check digit. Code25 Fontware
Code25Check(text) Returns the barcode string that becomes a valid code25 barcode after being formatted with code25 font. This function adds check digit.
ITF25(text) Converts the input into a valid interleaved 2 of 5 barcode. No check digit appended in this function. Interleaved 2 of 5 Fontware
ITF25Check(text) Converts the input into a valid interleaved 2 of 5 barcode. Append a check digit.

[a] Book industry is required to use ISBN-13 after Jan. 2007 to accommodate the demand for new numbers. The ISBN-13 number is an EAN-13 number with prefix 979 and 978. Use EAN13 function on 13-digit ISBN numbers.


Asian Language Support Functions

The functions below are designed to support double byte languages (Korean, Traditional Chinese and Simplified Chinese) and only apply to the following three products:

  • Code128 Fontware

  • Interleaved 2 of 5 Fontware

  • UPC/EAN/Bookland Fontware

These functions required Fontware Version 2.5 or later. These functions can be found in files with suffix Asian, such as MoroviaFontTools_Asian.c. Currently only Visual Basic and C are provided. For other languages, use the Windows DLL interface instead.

PRB: You Get Error Message "u2lcom.dll is missing" When Viewing Report

$
0
0

PRB: You Get Error Message "u2lcom.dll is missing" When Viewing Report

SYMPTOM

When you view a report with barcode UFL functions through Crystal Report Viewer ActiveX, Crystal Reports, or Crystal Reports Web, an error message box pops up with text The Visual Basic UFL that implements this function is missing(or U2LCOM.dll is missing).

CAUSE

There are several possible causes:

  • The u2lcom.dll is not present on the computer. U2lcom.dll is required for all COM-based UFLs. In some installations this DLL is not copied by default. This dll is not a COM dll therefore does not require registration. However, it must reside under the same directory as Crystal Report Engine DLL, crpe32.dll, or under Windows system directory.

  • The COM-based UFL is missing on the computer. If you copy the UFL to another computer, you must register it with the system. Furthermore, if you are calling the 64-bit Crystal Reports runtime, you need 64-bit COM DLL. Not all Morovia products include 64-bit UFLs. See KB1061 for more information.

RESOLUTION

  • If u2lcom.dll is missing from the system, copy the file from developer machine to the production.

  • Opening an administrator console and register the COM-based UFL. For 64-bit Crystal Reports runtime, locate 64-bit UFLs, or downgrade to 32-bit Crystal Reports runtime, following instructions in KB1061.


Deploy Crystal Reports .Net Web Application on 64-bit Windows

$
0
0

Deploy Crystal Reports .Net Web Application on 64-bit Windows

Morovia products released prior to January 2011 support Crystal Reports 32-bit mode only. Morovia is currently testing solutions on Crystal Reports native 64-bit mode. However, before it is completed, we only support client applications running on 32-bit mode. This document will be revisited once the test is completed.

Generally speaking, Crystal Reports 64-bit require 64-bit plug-ins - including database drivers, and UFLs. Morovia is going to release 64-bit UFLs in this year for most products.

Products that Currently Support 64-bit UFL

Linear Barcode Fonts

For linear barcode fonts, download the 64-bit font tools and install on the production server, and your existing application should work.

DataMatrix

DataMatrix Font & Encoder 5 (released in July 2011) fully supports 64-bit Crystal Reports. Note that the function prototype is different from 3.x, so that you need to modify the reort to use the new version. For detailed information, see here.

QRCode

QRCode Fonts & Encoder 5 (released in December 2011) fully supports 64-bit Crystal Reports. Note that the function prototype is different from 1.x, so that you need to modify the reort to use the new version. For detailed information, see here.

Products that Currently have no 64-bit UFL

If the existing product does not have 64-bit UFL, you need to install 32-bit Crystal Reports run-time and change application settings.

Warning

When running Crystal Reports in 32-bit mode on 64-bit OS, any third party database drivers, web servers and UFLs must also run in 32-bit mode.

Crystal Reports Runtime

Crystal Reports runtimes can be downloaded from this link: Crystal Reports v. 9.1 to 12.x VS .NET Runtime Distribution & Supported Operating Systems. Select 32-bit runtime only.

Recompile Application to target x86

  • Right click on projectProperties.

  • Go to compile tab.

  • Select the 'Platform' dropdown box.

  • Click on x86.

  • Create a setup package of your project.

Product Machine Changes

Follow the steps in SAP Note to change settings of the 64-bit OS to run Crystal Reports under 32-bit mode.

Font size decreases when report is exported to PDF from Crystal Reports XI or Crystal Reports XI Release 2

$
0
0

Font size decreases when report is exported to PDF from Crystal Reports XI or Crystal Reports XI Release 2

For the complete text, see SAP Note 1220516. For other versions of Crystal Reports, see KB10053.

SYMPTOMS

In Crystal Reports XI and Crystal Reports XI Release 2 the font shrinks by approximately 10% when a report is exported to Adobe Acrobat Format (PDF).

RESOLUTION

Caution

The following resolution involves editing the registry. Using the Registry Editor incorrectly can cause serious problems that may require you to reinstall the Microsoft Windows operating system. Use the Registry Editor at your own risk. It is strongly recommended that you make a backup copy of the registry files before you edit the registry. For information on how to edit the registry key, view the Changing Keys and Values online Help topic in the Registry Editor (Regedit.exe).

To solve the behavior

  1. Set the resolution of the default printer of the local computer experiencing the issue to 1200 DPI. Most printers have a default setting of 600 DPI.

  2. Create two registry keys to prevent the crxf_pdf.dll from decreasing in font size.

  3. Click StartRun. Type regedit. The Registry Editor appears.

  4. Create the following keys for Crystal Reports XI with the defined values:

    HKCR\Software\Business Objects\Suite 11.0\Crystal Reports\Export\PDF\ForceLargerFonts
    Type: DWORD
    Recognized Values: 0,1
    Default Value: 1
    Creation Method: manual
    
    HKLM\Software\Business Objects\Suite 11.0\Crystal Reports\Export\PDF\ForceLargerFonts
    Type: DWORD
    Recognized Values: 0,1
    Default Value: 1
    Creation Method: manual
  5. Set both registry key values to 1 to turn them on.

  6. Create the following keys for Crystal Reports XI Release 2 with the defined values:

    HKCR\Software\Business Objects\Suite 11.5\Crystal Reports\Export\PDF\ForceLargerFonts
    Type: DWORD
    Recognized Values: 0,1
    Default Value: 1
    Creation Method: manual
    
    HKLM\Software\Business Objects\Suite 11.5\Crystal Reports\Export\PDF\ForceLargerFonts
    Type: DWORD
    Recognized Values: 0,1
    Default Value: 1
    Creation Method: manual
  7. Set both registry key values to 1 to turn them on.

  8. Restart the Crystal Reports Page, Job and Cache Servers

Note

If using Windows 2003 Server, upgrade to Acrobat Reader version 8.0 or higher as well as creating the above registry keys.

APPLIES TO

  • Crystal Reports 11, 11.5

  • All Morovia Barcode Fonts

Creating concatenated USPS 128 Barcodes

$
0
0

Creating concatenated USPS 128 Barcodes

Morovia US Postal Fontware 3 and Code128 Fontware 3 contains code128 fonts that can be used to construct code 128 barcodes for USPS special services such as delivery confirmation and signature confirmation services. The USPS specification is available here.

It is recommended to use typeface MRV Post128 12 points to construct such a barcode string. Font Tools package includes an encoder function, USPS_EAN128, which is designed to encode 20-digit service information, as below:

  1. 2 digit service code

  2. 9 digit customer ID

  3. 8 digit sequential package ID

  4. modulo 10 check digit

The barcode reader outputs 22 digits with leading prefix 91. 91 is UCC/EAN (now GS1) application identifier for USPS special service.

This barcode can be combined with address information using UCC/EAN-128 concatenation. The combined barcode is read as 30 digits, with 420 at the beginning, followed by the 5-digit ZIP code, 91, and 20-digit service information.

How to Create Concatenated USPS Code128 Barcode

This section explains how you create the long 30-digit USPS code128 barcode. Before calling our encode function, you need to prepare the following information:

  • Delivery Address: 5-digit zip code such as 90030

  • Service Information: 20-digit service information, including the last modulo 10 check digit.

Using EAN128Ex function

If you have EAN128Ex function available, use the following format to enter the data: (420)12345(91)12345678901234567890. Leave 420 and 91 intact, and replace the zip code (12345) and service info (12345678901234567890).

Tip

You can find more information on EAN128Ex function at KB10048.

Using EAN128 function

You may also use EAN128 function. In this function, \199 is used to create FNC1 character (required by UCC/EAN-128). The format is like this: 420123456\1999112345678901234567890.

Again, replace 123456 with the zip code and 12345678901234567890 with service info.

Obtaining Barcode String in VBScript/PHP (DataMatrix/QRCode Fonts version 5)

$
0
0

Obtaining Barcode String in VBScript/PHP (DataMatrix/QRCode Fonts version 5)

Version 5.0 release of two products - Data Matrix Fonts & Encoder, as well as QR Code Fonts & Encoder provide more features than their predecessors. However, getting barcode strings in a script-only environment, such as Windows Shell Scripting (WSH) and IIS/ASP, is not documented in the manual. This is quite departed from version 3, when barcode strings are the only supported method.

We recommend that development utilizes the encoder DLL provided. The DLL exports QRCodeResultGetBarcodeString and DataMatrixResultGetBarcodeString, which can be used to obtain barcode string. In environments that COM objects are the only way to use, such as Windows Shell Scripting and classic ASP, you can use another COM object, which was conceived to support Crystal Reports, to get the barcode string.

The following two listings demonstrates how to get barcode string in QR Code Fonts 5 and Data Matrix Fonts 5 in VBScript. They were written for Windows Shell Scripting; however, with minor change they will work in classic ASP as well.

Example 1. QR Code Fonts & Encoder 5

option explicit
Dim obj, chunks
set obj = WScript.CreateObject("cruflMorovia.QRCode5")

Dim dataToEncode, version, ecLevel
dataToEncode = "some data to encode, put here " & _
    "some data to encode, put here " & _
    "some data to encode, put here " & _
    "some data to encode, put here " & _
    "some data to encode, put here " & _
    "some data to encode, put here " & _
    "some data to encode, put here " & _
    "some data to encode, put here "
    
' find out how many chunks are needed
' parameters: data-to-encode, version, error correction
version = 0     ' version
ecLevel = 0     ' error correction level
chunks = obj.QRCodeEncodeSet(dataToEncode,  version, ecLevel)

Dim barcodestring, i
barcodestring = ""
for i=0 to chunks
  barcodestring = barcodestring & obj.QRCodeEncodeGet(i)
Next

WScript.echo(barcodestring)

Example 2. DataMatrix Fonts & Encoder 5

option explicit
Dim obj, chunks
set obj = WScript.CreateObject("cruflMorovia.DataMatrix5")

Dim dataToEncode, sizeID
dataToEncode = "some data to encode, put here " & _
    "some data to encode, put here "
    
' find out how many chunks are needed
' parameters: data-to-encode, version, error correction
sizeID = 0      ' data matrix size ID
chunks = obj.DataMatrixEncodeSet(dataToEncode,  sizeID)

Dim barcodestring, i
barcodestring = ""
for i=0 to chunks
  barcodestring = barcodestring & obj.DataMatrixEncodeGet(i)
Next

WScript.echo(barcodestring)

You can find more information on the methods mentioned in the Crystal reports chapter of the product manual: QR Code 5 and Data Matrix 5.

PHP

On Windows platform, PHP provides a class called COM through which PHP script can create an instance of a CoM object and manipulate its methods. It is fairly straightforward to translate VBScript code to PHP.

Example 3. QR Code Fonts & Encoder 5 (PHP)

<?php
$obj = new COM("cruflMorovia.QRCode5");
$dataToEncode = "some data to encode, put here " ;
    
// find out how many chunks are needed
// parameters: data-to-encode, version, error correction
$version = 0;       // version
$ecLevel = 0;       // error correction level
$chunks = $obj->QRCodeEncodeSet($dataToEncode, $version, $ecLevel);

$barcodestring = "";
for ($i=0; $i<$chunks; $i++) {
  $barcodestring .= $obj->QRCodeEncodeGet($i);
}

echo($barcodestring);?>

Example 4. DataMatrix Fonts & Encoder 5 (PHP)

<?php
$obj = new COM("cruflMorovia.DataMatrix5");
$dataToEncode = "some data to encode, put here " ;

// find out how many chunks are needed
// parameters: data-to-encode, version, error correction
$sizeID = 0      // data matrix size ID
$chunks = obj.DataMatrixEncodeSet($dataToEncode,  $sizeID)

$barcodestring = ""
for ($i=0; $i<$chunks; $i++) {
  $barcodestring .= $obj.DataMatrixEncodeGet($i)
}

echo($barcodestring);

How to Print from Visual Basic 6 - Print Both From Controls and Barcodes

$
0
0

How to Print from Visual Basic 6 - Print Both From Controls and Barcodes

This article is contributed by Dragan Knezevic from Community Forum. If you want to have further discussion with Dragan, visit this link.

Question

I am trying to print the barcode from VB and I am having some problems. If I print the form by calling PrintForm method, then I am not able to scan the barcode because of print quality. If I use the Printer object and manually code everything it gets more complicated because I want to print checkboxes and I also have to worry about word wrapping.

Answer

Below is the code that made it work. You are free to use it in your applications. If you have any questions or comments about the code you can reply to this post and I will try to answer them. Simply call PrintBarcode from your printing routine and pass a string that you want to generate a barcode for. In order to generate a barcode you would need to purchase Morovia Barcode Fonts and copy and paste Code39, SpecialChar functions from the source code into your VB project. Hope this helps.

Public Sub PrintBarcode(ByVal MSR As String)
' =========================================================================================
' Programmer:        Dragan Knezevic
' Date:              July 19 2004
' Description:       Prints the contents of labels, textboxes (with word wrapping), 
'                    checkboxes(caption only), DTPicker and generates a barcode for the
'                    passed parameter.
'
' Parameters Passed: MSR: A string for which a barcode needs to be generated.
' Value Returned:    None
' Called by:         PrintFrm or your own sub
' Calls:             FormatStringAndPrint
'
' Last Revised:      n/a
' Changes made:      n/a
' =========================================================================================
    Dim ctl As Control
    
    Printer.PrintQuality = vbPRPQHigh
    Printer.Orientation = vbPRORLandscape 'or vbPRORPortrait
    Printer.FontName = "MS Sans Serif"  'or any other font used for controls
    Printer.FontSize = 8
    Printer.ScaleMode = 1   'twips
    
    For Each ctl In frmPrintBarCode.Controls 'or your form name
        If TypeOf ctl Is SSResizer Then GoTo Res'or any other controls that are invisible at run-time (Timer)
      'should not be printed
        
        Printer.CurrentX = ctl.Left
        Printer.CurrentY = ctl.Top
 'add other controls here if you want to print their caption
        
        If TypeOf ctl Is Label Or TypeOf ctl Is CommandButton Or TypeOf ctl Is CheckBox Or TypeOf ctl Is Frame Then
            Printer.Print ctl.Caption
        ElseIf TypeOf ctl Is TextBox Then 'add other controls here if you want to print their text
            'this wraps the text inside a textbox so it fits nicely
     'carriage return/line feed characters are removed prior to formatting
     FormatStringAndPrint Replace(ctl.Text, vbCrLf, " "), ctl.Left, ctl.Width
     
     'this draws a line around the edges of the textbox
            Printer.Line (ctl.Left - 50, ctl.Top - 50)-(ctl.Left + ctl.Width + 50, ctl.Top + ctl.Height + 50), , B
        ElseIf TypeOf ctl Is DTPicker Then 'date picker control
            Printer.Print ctl.Value
            Printer.Line (ctl.Left - 25, ctl.Top - 25)-(ctl.Left + ctl.Width + 25, ctl.Top + ctl.Height + 25), , B
        End If
Res:
    Next
    
    'after we printed the contents of individual controls we are ready to generate the barcode
    Printer.FontName = "MRV Code39M"
    Printer.FontSize = 12
    
    Printer.CurrentX = 12700 'X position of the barcode in twips
    Printer.CurrentY = 10930 'Y position of the barcode in twips
    Printer.Print Code39(MSR) 'Code39 function is available for users that bought Morovia Barcode Fonts
    Printer.EndDoc
    
End Sub
Public Sub FormatStringAndPrint(sInput As String, TempX As Long, tempWidth As Long)
' =========================================================================================
' Programmer:        Dragan Knezevic
' Date:              July 20 2004
' Description:       Formats each texbox before printing a barcode so that the text
'                    wraps inside the control
'
' Parameters Passed: sInput: text inside of the control free of carriage returns.
'                    TempX : current x position of the control
'                    tempWidth: width of the control.
'
' Value Returned:    None
' Called by:         PrintBarcode
' Calls:             Nothing
'
' Last Revised:      n/a
' Changes made:      n/a
' =========================================================================================
    Dim sTemp As String
    Dim bSpace As Boolean
    
    Do
        If Printer.TextWidth(sInput$) <= tempWidth Then
                sTemp$ = Trim(sInput$): Exit Do
        End If
     
        Do
            sTemp$ = sTemp$ & Left(sInput$, 1)
            sInput$ = Right(sInput$, Len(sInput$) - 1)
            Debug.Print sTemp
            Debug.Print Printer.TextWidth(sTemp)
        Loop While Printer.TextWidth(sTemp$) < tempWidth - 100
        
        Do
            If Right(sTemp$, 1) = Chr(32) Then bSpace = True
            If Not bSpace Then
                sInput$ = Right(sTemp$, 1) & sInput$
            End If
            sTemp$ = Left(sTemp$, Len(sTemp$) - 1)
        Loop While Not bSpace
        
        bSpace = False
    
        Printer.Print sTemp$: sTemp$ = ""
        Printer.CurrentX = TempX
    Loop
    
    Printer.Print sTemp$
End Sub
Viewing all 128 articles
Browse latest View live